The essential guide to learning how to master 3D rendering
If you’re learning 3D design and after opening the render settings of your chosen 3D software, you’re intimidated by the number of settings and variations, and having no clue what any of the terminology mean, it’s tempting to just shut everything down or just use the basic settings and click render. This might work for some who are looking for basic results but it won’t be long until you need to acquire some control over your images, which is the main reason why you decided to learn 3D design anyway, but where do you begin?

If you’re a beginner in 3D design and unsure how to get results from your 3D software, this article is designed for you. It’s intended to be brief and to the point, a one stop shop to help you get past the basic settings of your 3D software and take control of your final rendering outputs.
It’s not intended to be a detailed explanation of what each button does, so it will not explain every last setting in great depth, but it will go over enough of the basics to get you in control of the rendering process and give you the key topics to go and study in more depth. The reason for this is because although most 3D software use very similar processes, some use different terminologies, so this is aimed at going over the general process of rendering, not singling out any particular software
Here are the steps we’ll cover for learning how to render with your 3D software.
1. Mastering resolution
2. Understanding Global Illumination
3. Understanding colour mapping
4. Understanding antialiasing filters
5. Learn about file and types and sizes
6. Learn camera settings
There is a lot more to learn if you want to become a master but let's dive into each of these topics.
1. Mastering Resolution
The best place to start is with resolution. This is the final size of your image. It’s a fairly straight forward process and is directly related to what the final image will be used for and where it will end up. Is it on screen? is it going to be printed out? if so at what size?
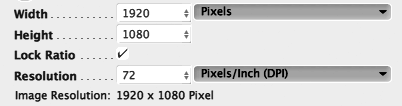
For example if you are producing an image to be printed at A3 paper size but will also be presented on screen, you shouldn’t need to produce two separate images. In theory you can use the one you produced for print (print resolution tend to be higher), then make a copy and scale the image down to work for the screen version. Except, print and screen formats are different. These days, standard screen ratio is usually 16:9 whereas a standard print ratio is 4:3. So in the end you will have to create two separate images for both mediums. This is a distinction that often gets overlooked. So next time you are about to produce an image, don’t just think ‘highest’ or ‘biggest’, think ‘what medium is it for?’
As a footnote, HD size image for the screen are usually rendered at 1920 X 1080 (16:9 ratio), and your software should be able to determine the pixel size of you image for print if you specify the actual paper size in metrics or imperial.
2. Understand indirect Illumination (or GI)

Indirect illumination is basically the way light bounces around a controlled environment (like a room for example). This setting is most often used when producing images of interior environments, and the reason is simple; If light bounces naturally from surface to surface until it fades out, it needs surfaces to bounce off of. And the more it bounces around the more accurate you final image will be, depending on how complex your scene is.
Most 3D software have an indirect illumination switch. It’s usually fairly straight forward and you won’t need to manipulate the settings much to get something fairly descent. We won’t cover advanced indirect illumination settings in this article.
Once you switch the GI on and render your scene, your image will take a bit longer to render since the software has to calculate the amount of times light bounces around the surfaces of your 3D model.
You shouldn’t use GI as a default setting for all your images. Oftentimes it’s not necessary, especially if you're not working within a controlled environment (imagine light bouncing off to infinity). This will only take longer to render your scenes and the result won’t be that much different.
3.Understanding colour mapping

Colour mapping is simply the way your renderer deals with overexposed colour, especially white. When using a lot of white and bright colours in your scene, you’ll realise that a lot of it gets blown out and the result is a harsh looking image with areas of overexposed colours. Colour mapping helps you deal with those issues. There are usually six or seven filters for you to choose from. Each deal with overexposure differently. Below is an example of how the ’Exponential’ and 'HSV Exponential' filters works on the final image.

You can test each of them out on your renders to see which one works best, after a while you’ll be able to tell which works best without having to go through them all, and that’s if you need them at all.

Exponential (Left), slightly desaturated. HSV Exponential (right), richer in colour depth.
4. Understanding antialiasing filters

Antialiasing has to do with how the renderer handles the edges between each element in your scene. The default is usually ‘Area’ but you can apply other ones to see which works best for your image. For example the ‘Catmull-Rom’ filter gives your images a very sharp and crisp look whereas ‘Mitchell-Netravali” gives you a softer and more blurred result. Each filter is different and you’ll need to decide which works best for your image.

Mitchell-Netravali (left), slightly blurred. Catmull-Rom (Right), much sharper edges.
5. Learning about file types and sizes
The preferred file type for your images will vary depending on the creative field your’e in. the tiff file format is widely used in interiors and architecture, jpegs and png are widely used for the web. Many other artists use the Targa formats. The choice is yours when it comes to file formats but to be safe you should use a format that compresses you image size the least. These are Tiff and Psd. Though great for the web, jpegs and pngs don’t offer the best control when it comes to post processing and retouching, so if in doubt go for uncompressed tiff or psd. If you are rendering an animation, Targa files are a great alternative to Tiffs, which can be quite heavy at times.

6 .Learn camera settings
Camera settings are important. These settings often determine how good your final image will look. Camera settings may look different in various softwares, but the principles are the same. We’ll go over the most important ones.
FOCAL LENGTH.
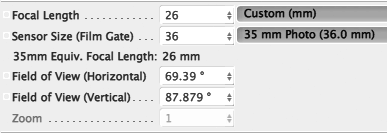
The focal length of your camera basically determines how much of the subject and its surrounding you want to capture. A wide lens (18mm) will give you more context but will also distort the image. Wide angle shots are usually used for architectural shots. A narrow angle setting will be more focused and detailed. it’s usually used for vignette type images where the subject is small and needs to be the focus point.
F-STOP (EXPOSURE)
The F-stop setting of you camera measures its aperture i.e. how wide the aperture opens up to let light in. A large aperture (smaller number f/2, f/4) will let more light in and make the image look brighter. This is great when your image is looking good but slightly too dark. Instead of increasing the intensity of your lights in the scene (especially if it’s a heavy scene), you can just lower the F/stop setting to get a brighter result.
ISO
ISO measures how sensitive the lens of your camera is to the light coming into the camera through the aperture. The more sensitive (higher number) the brighter the image. This can sometimes cause the final image to look grainy. A look that you may or may not want. A lower number won’t be grainy but will be darker. A low iso setting is great when doing outdoor renderings with sunlight. It’s best to keep the ISO setting to a low amount so you end up with less noise in your final image.

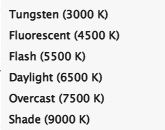
WHITE BALANCE
Not all software camera settings will have this setting, but if yours does, it’s a great compensator for general colour and mood of an image.
White balance basically deals with colour temperature. Different light sources emit different colour temperatures (such as the sun, a light bulb or fluorescent strips). Colour temperature goes from blue to red (cold to warm). our brains are smart enough to adjust to various light temperatures to give us a more constant result in colours. However the camera isn’t that intuitive. You basically need to specify what type of light source is mainly lighting your scene before it can adjust the temperature for you final image. There usually are five settings dealing with temperature.
Daylight- If you’re scene is outdoors on a sunny day
Cloudy- if your scene is outdoors on a cloudy day
Shade- If you are rendering an image in the shaded environment
Tungsten- This setting is used for indoor rendering where the light temperature is overly warm.
Fluorescent - This setting is used for indoor renderings where the light temperature is overly cold
So this is an overview of the rendering settings you will come across and need to master no matter what 3D software you are using. You don’t necessarily need to understand them straight away, but as you continue to learn 3D design, you will inevitably have to understand them. The best steps that will give you the most noticeable results are the 'camera settings' and the 'indirect illumination', especially if you do a lot of interior image production. Once you are familiar with those, you can dive deeper into more advanced settings to give you even more control over your outputs.
Soon enough you won’t just be hitting the render button and hope for the best.